react ( Udemy강의 ) - 7. Redux
Redux
- 크로스 컴포넌트 또는 앱 와이드 상태를 위한 상태관리시스템
- 다수의 컴포넌트나 심지어는 앱 전체에서 관리하도록 도와줌
State
1. Local State : 데이터가 변경되어서 하나의 컴포넌트에 속하는 UI에 영향을 미치는 상태
useState/useReducer를 사용해 컴포넌트 안에서 로컬 상태 관리
2. Cross-Component State : 다수의 컴포넌트에 영향을 미치는 상태
props chains ( prop drilling )
3. App-Wide State : 애플리케이션의 모든 컴포넌트에 영향을 미치는 상태
props chains ( prop drilling )
-> 리액트 컨텍스트 & 리덕스 : 크로스 컴포넌트 상태나 앱 와이드 상태를 관리하도록 도와줌
Redux VS React Context
React Context - Potential Disadvantages
- Complex Setup / Management : 앱 사이즈가 커지면 그만큼 Context도 많아짐 / 하나의 Context면 관리하기 힘듬
- Performance : 고빈도 데이터에 적합 X
- 리액트 컨텍스트가 모든 시나리오와 모든 경우에서 리덕스를 대체 불가능
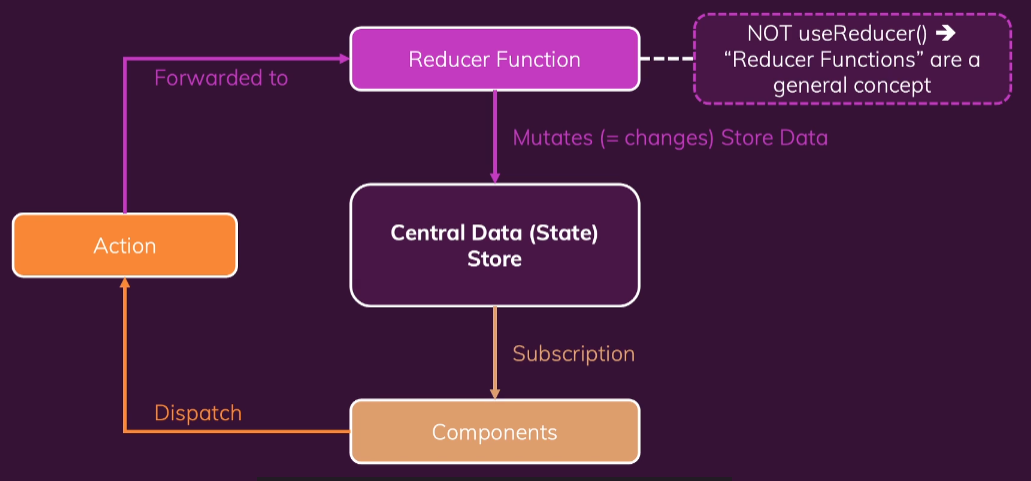
리덕스 동작 방식
하나의 Central Data (State) Store - 전체 애플리케이션의 모든 상태를 저장
절대로 저장된 데이터를 직접 조작 X

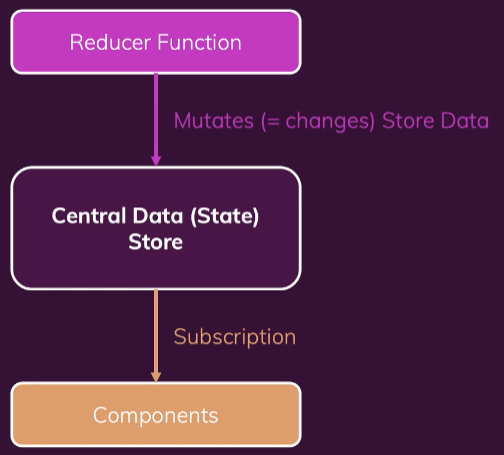
- useReducer()가 아닌 Reducer Functions 일반적인 개념이다.
- Reducer Functions : 저장소 데이터의 업데이트 담당
사용방식
1. store - index.js
import redux, { createStore } from "redux";
const counterReducer = (state = initialState, action) => {
  if (action.type === "increment") {
    return {
      counter: state.counter + 1,
      showCounter: state.showCounter,       // 설정하지 않으면 객체가 사라짐 ( undefined )
    };
  }

  return state;
}


// 리덕스 스토어를 만들어준다.
const store = createStore(counterReducer);

export default store;
2. counter.js
import React from "react";
import { useSelector, useDispatch } from "react-redux";


const Counter = () => {
  const dispatch = useDispatch(); // Redux store에 대한 action을 전송
  const counter = useSelector((state) => state.counter); // 자동으로 리덕스 스토어가 바뀐다면 컴포넌트 함수가 다시 실행 -> 항상 최신 state
  const show = useSelector((state) => state.showCounter);

  const incrementHandler = () => {
    dispatch({ type: "increment" });
  };
  const increaseHandler = () => {
    dispatch({ type: "increase", amount: 5 });
  };

  const decrementHandler = () => {
    dispatch({ type: "decrement" });
  };

  const toggleCounterHandler = () => {
    dispatch({ type: "toggle" });
  };

  return (
    <main className={classes.counter}>
      <h1>Redux Counter</h1>
      {show && <div className={classes.value}>{counter}</div>}
      <div>
        <button onClick={incrementHandler}>Increment</button>
        <button onClick={increaseHandler}>Increase by 5</button>
        <button onClick={decrementHandler}>Decrement</button>
      </div>
      <button onClick={toggleCounterHandler}>Toggle Counter</button>
    </main>
  );
};

export default Counter;
주의 사항
- 절대 기존의 state를 변형해서는 안된다.
-> 대신에, 새로운 state 객체를 반환하여 항상 재정의한다.
참고자료 : https://academind.com/tutorials/reference-vs-primitive-values
애플리케이션 규모가 클 때의 문제점
1. 액션 타입에서 문제 발생 - 식별자 오타
2. 상태 객체가 커진다. - 모든 상태 속성 유지 - 파일이 거대해짐
-> Redux toolkit
Redux toolkit
npm install react-redux
npm install @reduxjs/toolkit
설치 후 package.json에서 redux를 지워야함 - redux toolkit에 리덕스가 있음.
- createSlice / createReducer -> 하지만 createSlice가 더 좋다 - 한번에 몇가지를 단순화
import { createSlice } from "@reduxjs/toolkit";

const counterSlice = createSlice({
  name: "counter",
  initialState,
  reducers: {
    increment(state) {
      state.counter++;
    },
    decrement(state) {
      state.counter--;
    },
    increase(state, action) {
      state.counter = state.counter + action.amount;
    },
    toggleCounter(state) {
      state.showCounter = !state.showCounter;
    },
  },
});


export const counterActions = counterSlice.actions; // 액션 객체 생성 및 고유한 식별자를 생각해내는 작업 X

// configureStore : 여러개의 리듀서를 하나의 리듀서로 쉽게 합칠 수 있다.
const store = configureStore({ reducer: {counter:counterSlice.reducer} });
// 모든 리듀서를 하나의 큰 리듀서로 병합
import { counterActions } from "../store/counter";
const dispatch = useDispatch(); // Redux store에 대한 action을 전송
const counter = useSelector((state) => state.counter.counter);
const incrementHandler = () => {
dispatch(counterActions.increment());
};- 자동으로 최근 state를 받음
- 액션 필요X -> 어떤 액션을 했느냐에 따라 메서드가 자동 호출
- 원리 : 기존상태는 바꿀수없지만 리덕스툴킷이 코드를 감지하고 자동으로 원래 있는 상태를 복제 그리고 새로운 상태 객체를 생성 -> 모든 상태를 변경할 수 없게 유지하고, 저희가 변경한 상태는 변하지 않도록 오버라이드한다!
- useSelector : 리덕스 관리 상태에서 데이터를 읽음
- useDispatch : 리덕스 관리 상태에 액션으로 접근